One of the best ways to make your cat feel comfortable with receiving subq fluids is to warm the fluids first, so that they’re close to kitty’s body temperature.
A small number of cats prefer fluids to be at room temperature, so be sure to experiment to see what works best for your kitty.
Key Points
- Average body temperature for cats is 100.5 – 102.5 degrees Fahrenheit or around 38.6 Celsius
- Water baths and incubators should be set to no higher than the cat’s body temperature for warming fluids
- Room temperature fluids are too cold to be comfortable for most cats
- Fluids should not be warmed above your cat’s body temperature because they can burn your cat underneath their skin
Warming Methods
Water Bath – Low Tech
A water bath is the easiest way to warm up a bag of fluids. For this method you simply need a large bowl or pan or container of some sort that is big enough to hold your bag of fluids and some water.
- Get a bowl and fill it with warm water
- Put your fluid bag in the water with the line end pointing up (not submerged)
- Let your bag sit for about 10 minutes until it reaches the temperature of the water it’s sitting in
- Before use, squish the fluids in the bag around a little bit to evenly mix them so that there are no cold spots in the bag
- Before use, run some fluids through your line so that the cold stuff in the line is replaced by the warm fluids from the bag
Water Bath – High Tech
The “high tech” water bath is exactly the same process as the low tech version, except that you use a sous vide machine or immersion stick to control the water temperature. This is my absolute favorite way to do the water bath for warming fluids because if there is any delay in getting ready for your session your fluids won’t need to be re-warmed. They’ll be held at the right temperature for however long it takes you to get ready, and you have the added bonus of precise temperature control.
I use the immersion stick because I needed an option that was small and space-saving for my small kitchen. And, because I live in a water-poor part of the world, I either make sure to reuse the water for watering plants, or for refilling my Berkey water filter for drinking.
Water Bath Tips for Either Method
- A thinner metal mixing bowl will lose heat faster than glass, ceramic, plastic, or thicker metal bowls
- A full bag will take longer to heat than an emptier bag
- The amount of fluid in the bag can be used to decide how hot the water bath should be
- For a full bag you may want the water bath to be 2-3 degrees warmer than the fluids should be. So, if you want your fluids to be 100 degrees, set your water bath to 102 or 103 degrees
- For an emptier bag you will want the water bath to be the same temperature that you want the fluids to be. If you have 200 ml left in the bag and you want your fluids to be 100 degrees then you should set your water bath to be 100 degrees
- Do not submerge your line or any of the ports in the water
- If you are careful you can safely submerge the portions of the line that do not have any ports or connections, but it is very easy to make a mistake and possibly introduce contamination in your line if any of those areas are submerged
Heating Pad
If you have a heating pad you can wrap it around your bag of fluids and leave them sitting to warm up. I have never used this method myself, but I’ve read that it can take about 30 minutes for the fluids to warm up in a full bag this way. An emptier bag will heat up faster.

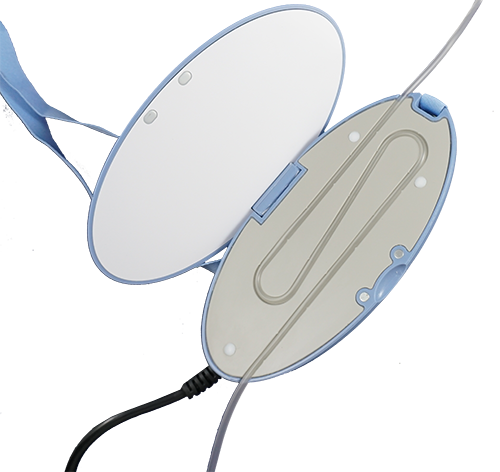
One way to set up the heating pad method comes from a kitty named Sara and her human. Sara’s mom bought a small heating pad and added a couple buttons to the cover to hold the pad around the bag.
- Turn the heating pad on about 90 minutes before giving fluids
- Use a smart plug if you want to control it from your phone or run it on a timer!
- When the heating time is up, squish the bag a little to evenly mix the fluids and get rid of any cold spots
- Check the temperature with an infrared thermometer
- Prep the needle and go!
The opening at the side of the setup lets you see how much you’re giving (make sure the opening is next to the measuring lines)
The bag and heating pad are are independently attached to the coat hanger to avoid stress to the bag itself.
The water warms up at about 4 degrees every 15 minutes. Now the entire prep/ administer/ clean process is 10 minutes from start to finish!
Commercial Bag Warmers
There are commercially available products specifically designed for warming fluid bags. These can run anywhere from $100 to $8,000 depending on where you shop. I have never purchased or used any of these so I can’t vouch for any particular brand. If you do decide to purchase a commercial product you may want to check eBay first to see what you can get. Often you can find new or refurbished items with product guarantees on eBay for much less than on any other site.
IV Line Warmers
Commercial Line Warmers
A study done by NCBI on the use of line warmers during blood transfusions showed that commercial line warmers weren’t able to warm the fluid to body temperature at high flow rates. Based on that, commercial line warmers might not be a good choice for subq fluids because of the delivery speed.
DIY Line Warmers
If your setup for giving fluids allows you to have the line coiled on a flat surface you can cover the line coil with a sock that has been filled with uncooked rice and heated in the microwave for 2 minutes. The fluid will warm up as it passes under the rice. The line must be able to be coiled though, so that the fluid will spend sufficient time under the rice to be warmed.
